Viewing Java Source Code
Introduction
When you open an event in the Dashboard, OverOps displays the decompiled application bytecode and projects the runtime variable data onto it. With standard Java or C#, the decompilation accurately reflects the source code (excluding annotations). For non-Java languages running on the JVM (such as Scala, JRuby, Clojure), or non-C# languages running on the CLR (such as VB.NET, F#), and/or to display annotations, OverOps requires that you attach the original source code to the OverOps Agent. This procedure can also be applied when using a code weaver that expands your bytecode with large amounts of synthetic code.
Attaching your source code to OverOps involves a minor customization of the build steps - per environment. For the complete steps, see below.
Methods for Displaying the Source Code in OverOps
There are a number of ways to display the source code in OverOps including:
- Attach the source code folder or jar file to either the Collector (for SaaS or On-Premises modes) or to the Variable Store/Storage Server for Hybrid deployments
- Attach the source code for a specific event
- Include the source code in binaries (see Additional Methods for Attaching Source Code for details
Obfuscated Code may not be SupportedOverOps may not support obfuscated code that can’t be decompiled (or when decompiled generates garbage). In these cases, you'll need to attach the source code.
Attaching Source Folders or Jar Files
SaaS and On-Premises Deployments
Native source code that co-resides on the machine on which the OverOps Collector is running can be attached to OverOps through the JVM command-line (for JVM languages only), environment variable setting or property settings in the agent.properties file. This method is required for viewing non-Java (non-C#) source code (such as Scala, JRuby, Groovy or Clojure).
To attach the source code to the machine running the OverOps Collector:
- Place a directory with the source code or the source code jar file on the machine on which the OverOps Collector is running. There are two ways to do this: using JVM arguments (for JVM only) or using the agent.properties file.
- To use the JVM argument option, add one of the following agent property arguments to the JVM startup options:
-Dtakipi.sources.path=/your/source/dir/here
-Dtakipi.sources.path=/your/source/jar-file-here
For example:
java -Dtakipi.sources.path=/opt/my-app/src -jar myApp.jar
java -Dtakipi.sources.path=/opt/my-app/src/myAppSource.jar -jar myApp.jar
You may specify multiple directories, by separating the paths using ';' (Windows), or ':' (Linux / macOS):
java -Dtakipi.sources.path=/opt/my-app/src:/opt/another-app/src/main/scala -jar myApp.jar
NoteEven though the command line option (or agent property) is provided to the OverOps Micro-Agent on the machine on which the application is running, the source code (or jar file) path in the -Dtakipi.sources.path refers to a folder (or jar file) resident on the machine on which the Collector is running. Usually the Collector will be installed on a different machine than the one on which the application being monitored is installed The given path does not need to exist on the application server machine, only the OverOps Collector machine.
- To use the agent.properties file option, add the path to the agent properties:
takipi.sources.path=/your/source/dir/here
takipi.sources.path=/your/source/jar-file-here- Restart the JVM for the new setting to take effect.
- To see the newly attached source code in the ARC screens for new and existing events, use one of the following methods
5a. Restart the OverOps Collector
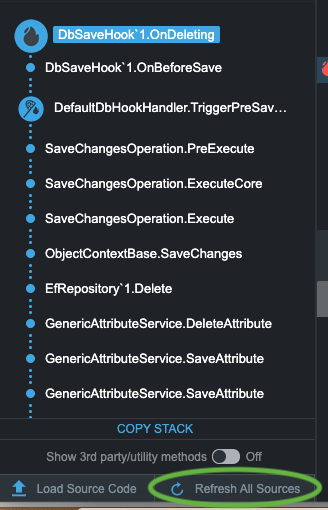
5b. Click the button in the ARC screen: "Refresh All Sources".

Hybrid Deployments
- On the Variable Store (storage) machine, the sources folder is going to be relative to the storage main folder:
opt/takipi-storage/storageSources should be deployed with a version under a specific folder:
/opt/takipi-storage/storage/sources/v1/app1Any jar file should be expanded into source files/folders, since we can only detect source files (those that end with .java/.clj/.cljs, etc.) in the Variable Store (aka Storage Server).
- On the Micro-Agent machine, start the Micro-Agent with the new remote sources path:
java -agentlib:TakipiAgent -Dtakipi.remote.sources.path="sources/v1/app1" -jar app.jarNote that you can add multiple folders with a ":" separator.
Attaching Source Code for a Specific Event
If you decide not to attach the source code file to the application, you can choose to load it to a specific event.
To attach the source code to a specific event:
- From the OverOps Dashboard, open the event.
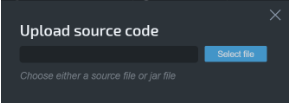
- From the ARC Screen, in the bottom left corner, click Load Source Code.

- Click Select file and browse for the source code file.
- When finished, click Done.
The source code is now available for the event to which it was attached.
Additional Methods for Attaching Source Code
Additional Options for Attaching Source Code in Java
Attaching Source Code using SBT/Play Framework
Attaching Git Repositories
Updated 9 months ago
