Tomcat
Naming Your Application and Deployment
Naming your applications and deployment allows us to aggregate your data and to sort, view, and compare them from version over version. The data then feeds into our dashboards (without using a naming convention your data loses value):
- Give the application a name you'll be able to easily track
- Give your deployment a distinct name so that whenever you deploy new code to your application, you'll be able to distinguish between different deployments that will show up in the OverOps Dashboard.
Use these arguments for the application name and deployment name:
-Dtakipi.application.name=<APPLICATION_NAME>
-Dtakipi.deployment.name=<DEPLOYMENT_NAME>
For Tomcat specifically, you'll need to add the
application.nameto theexport CATALINA_OPTS …variable (see Linux/macOS for details).
To learn more, see Naming the Application, Server, Deployment.
Attaching the OverOps Agent to a JVM Running Java 10 or 11
When attaching an OverOps Agent to a JVM that is running Java 10 or 11 or any IBM java versions, follow these guidelines:
- Turn off Class Sharing: This can be done using the following flags:
for IBM Java
‑Xshareclasses:none
for HotSpot
-Xshare:off-XX:-UseTypeSpeculation
- Increase ReservedCodeCache to at least 512mb by adding the following flag
-XX:ReservedCodeCacheSize=512m
- The Agent should appear last in the VM arguments list before specifying the main class or jar.
- When adding/removing 3rd party packages, the Agent should be restarted.
Additionally, if you wish to upgrade your own compiler to target Java 10/11, then you'll have to upgrade your Collector (SaaS) or Collector + backend (On-Premises) to support it.
When OverOps is installed on your machine, connect it to your Tomcat server.
Rootless Agent Installation Method (Linux only)
When Using the Rootless Agent Installation Method replace the
-agentlib:TakipiAgentJVM startup Argument
with
-agentpath:<TAKIPI_HOME>/lib/libTakipiAgent.soJVM startup Argument
Linux/macOS
To connect OverOps to Tomcat running on Linux/macOS:
- Locate the catalina.sh file used to run Tomcat.
- If it doesn’t already exist, create a setenv.sh file in the same folder.
- Add the following line to the end of setenv.sh file:
CATALINA_OPTS="$CATALINA_OPTS -agentlib:TakipiAgent"
Defining CATALINA_OPTS variable should be run in the terminal instead: export CATALINA_OPTS="$CATALINA_OPTS -agentlib:TakipiAgent"
- Restart Tomcat.
- Test your Installation
Windows
- Locate the catalina.bat file used to run Tomcat.
- If it doesn’t already exist, create a setenv.bat in the same folder.
- Add the following line to the setenv.bat file before the rem Execute Java with the applicable properties line:
set CATALINA_OPTS=%CATALINA_OPTS% -agentlib:TakipiAgent - Restart Tomcat.
- Test your Installation.
Windows Service
Apache Tomcat has a configuration application which allows you to specify JVM arguments for the server when running as a service.
To add the OverOps agent to Tomcat (Windows):
- In the Start menu, from All programs, select Apache Tomcat (version), and click Configure Tomcat.
Note
On Windows Server 2012 + use the following command to edit the Service Properties:
tomcat8w.exe //ES//<service_name>
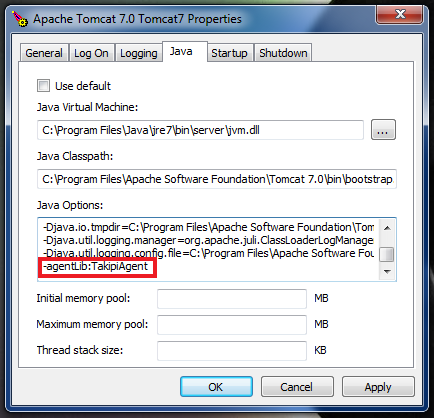
- From the Apache Tomcat Properties, switch to the Java tab and in the Java Options field, add:
-agentlib:TakipiAgent.
- Click Apply and then OK.
- Restart your machine.
- Test your Installation
Application Plugins
Tomcat-Eclipse Plugin
To connect OverOps to Tomcat:
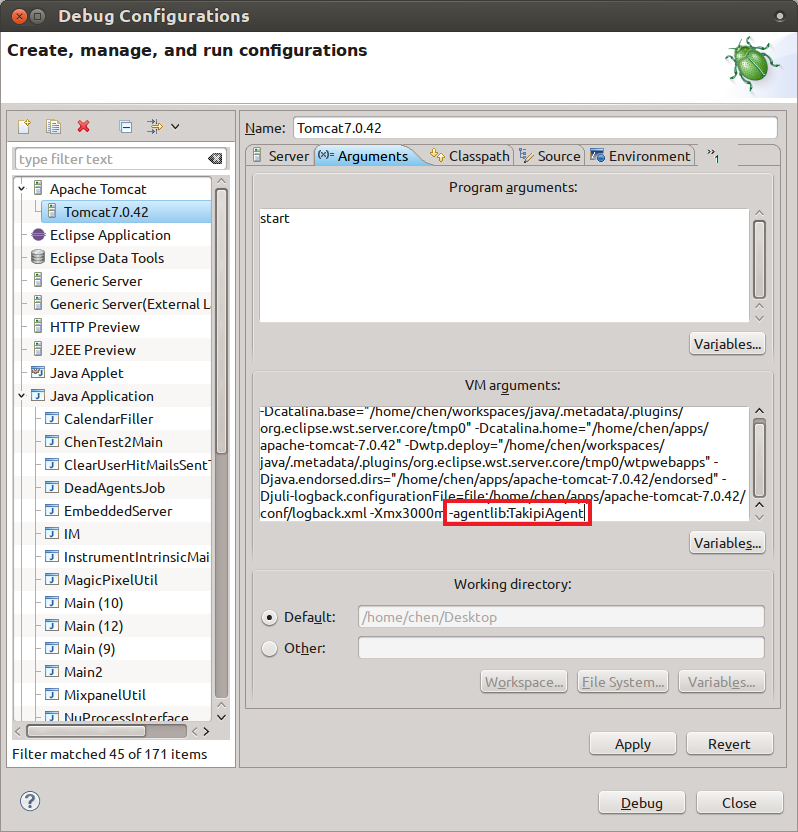
- From Eclipse, click Run and select Debug Configurations.
- From the Debug Configurations dialog box, select Apache Tomcat and then click the relevant
<Tomcat configuration>. - From the Arguments tab, in the VM arguments field, add:
-agentlib:TakipiAgent
or respectively
-agentpath:<TAKIPI_HOME>/lib/libTakipiAgent.so
- Click Apply and then Close.
- Restart Tomcat.
- Test your Installation
Tomcat-IntelliJ Plugin
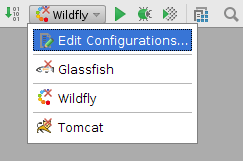
- From IntelliJ, open Edit Configurations.
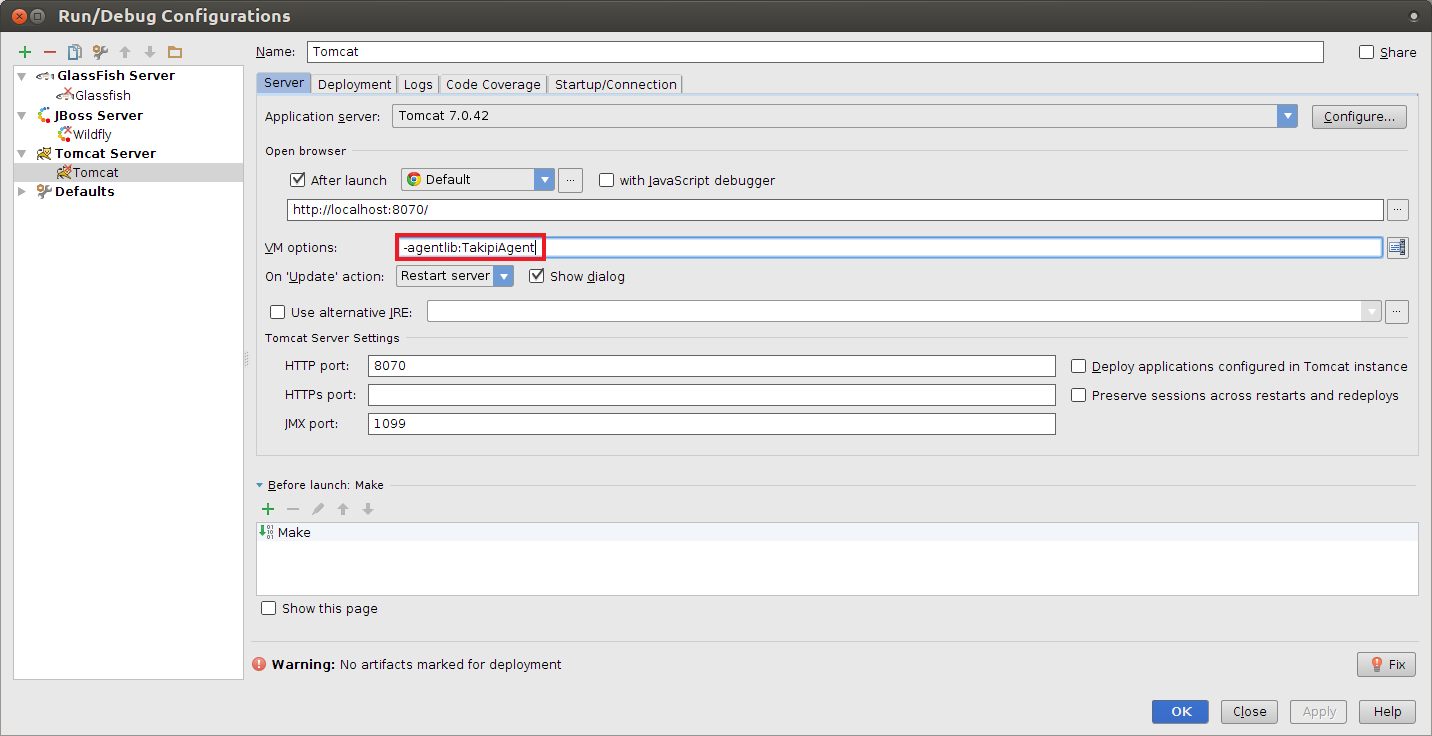
- From Run/Debug Configurations, in the VM options field,
add:-agentlib:TakipiAgent
or respectively
-agentpath:<TAKIPI_HOME>/lib/libTakipiAgent.so
- Click OK.
- Restart Tomcat.
- Test your Installation
Tomcat-NetBeans Plugin
- From NetBeans, from the Services window (Window | Services), click Servers.
- Right click the Apache Tomcat server and select Properties.
- In the Server Properties dialog box, switch to the Platform tab.
- In the VM Options field,
add:-agentlib:TakipiAgent
or respectively
-agentpath:<TAKIPI_HOME>/lib/libTakipiAgent.so
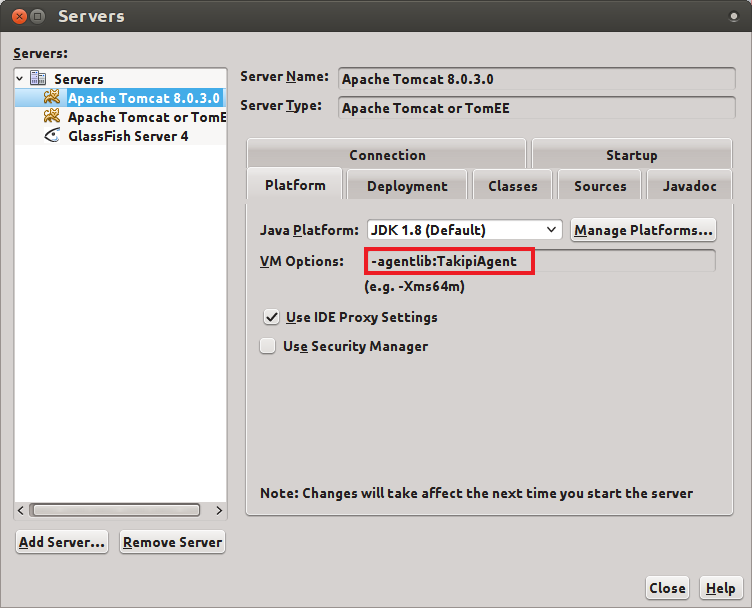
- Click Close.
- Restart Tomcat.
- Test your Installation
Updated 9 months ago
