SaaS Installation
Introduction
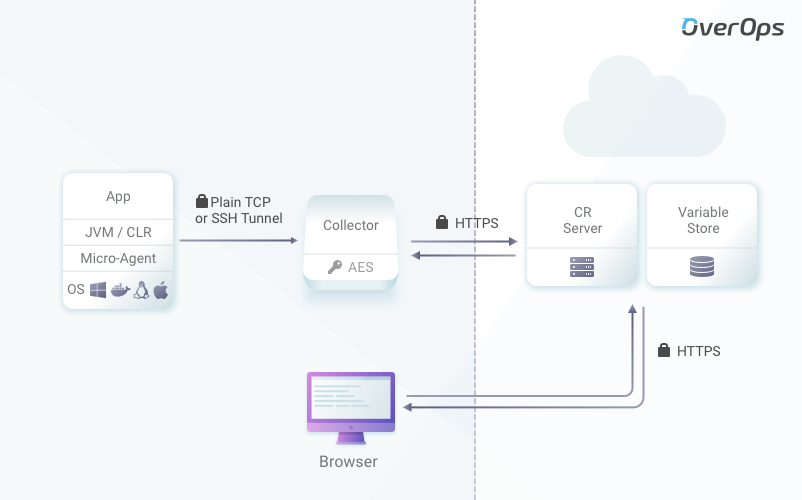
The SaaS deployment is fairly simple; however, there are still a number of steps that you'll need to take to install OverOps using the SaaS deployment.
As you can see from the matrix below, the two components that you'll need to install are the Micro-Agent(s) and the Collector. The Variable Store (aka Storage Server) and Continuous Reliability (CR) Server (aka Analysis or OverOps Server) are maintained by OverOps, and the Collector connects to them automatically once the servers are started.

Note that OverOps can be installed inside Docker containers using two approaches:
- Install the Collector(s) (in Docker or on Kubernetes)
- Attach the Micro-Agent to your application.(to Docker Containers or Containers in Kubernetes)
System RequirementsOverOps requires 64-bit Windows and a 64-bit Java installation. See Software and Hardware Requirements for details.
SaaS Installation Procedure
The installation procedure includes the following steps:
- Install a Collector
- Install an Micro-Agent
- Attach the Micro-Agent and verify the connection.
- Optional (Advanced): Configure High-Availability and Load Balancing
Adding an EnvironmentThe SaaS installation procedure assumes that you've already created a working environment. If you haven't, refer to the article Add an Environment for an explanation on how to create one.
Collector High Availability and Load BalancingOverOps supports multiple Collectors that can be configured for high-availability and/or for load balancing. For high-availability, traffic is routed as round-robin according to the master endpoint configuration.
For load balancing, routing depends on the load-balancer policy settings.
To configure Collector high availability and to build a Load Balancer using Nginx for multiple Collectors, follow the instructions in the this article.
Updated 9 months ago
