Manage Team Members
Introduction
OverOps promotes working in teams: transferring events to another team member, notifying a team leader, or just for reassurance. OverOps enables you to share error analysis with team members and grant or revoke access to the Dashboard for any number of people.
Adding or Removing Team Members
Unlimited number of team members can be invited to view events occurring on the monitored server (or group of servers), allowing each member to create their own view and filter for relevant items.
To add a team member:
- Open Settings by clicking Settings in the top right corner of the OverOps dashboard.
This opens the Settings dashboard for the environment you're in (you can see the environment in the upper left corner of the screen).
- Under the "General Settings->Team" menu, enter the team member’s email address, select the role you assign for this user (either member or viewer) and click Add.
An email invite to the OverOps deployment is sent. To accept the invitation, the new team member will need to click the link in the email. - At any point in time after the invitation has been sent you can change the team member's permissions (admin, member or viewer). You can only assign a user an admin role after you've added that user to the installation key.
NoteThis functionality requires admin or owner privileges and can be changed.
Once the invitation is accepted, the new team member is prompted to register at OverOps to access the analysis information.
Invited team members with no account, are displayed in the Team Settings window as 'Invitation pending'. Deleting team members blocks access to the servers associated with that account (or specific installation keys when using multiple keys).
An invitation is associated with the installation key used at the time the team member was added. When managing multiple environments, you can use multiple keys to control which servers are accessible for each user by using an installation key for each group of servers (for example: production servers, development, QA, etc). To allow team members access to multiple environments, you must invite them separately for each key.
Searching for Specific Members
To search specific member by name, enter a name or email address in the search box and click the search icon.
User Privileges
Member - New team members gain admin-like permissions to use OverOps and to add new servers to the list of monitored servers. They can also view errors and exception analyses, add labels, hide and resolve errors, submit Jira issues, create their own private filters, share errors with other team members, and add additional team members.
Viewer - New viewers gain read-only access to the environment.
A viewer can access the Events explorer, edit event notes, access the different team views, the ARC screens and the Reliability Dashboard.
However a Viewer will have limited access to the Settings, to the API and will not be allowed to invite other members use the installation key (or to generate a new installation key); however, a viewer will be allowed to create new installation keys only if this user has different roles in other environments.
Privileges reserved for Admins and Owners include editing security and account settings, as well as revoking access for team members added by that admin/owner.
An owner only controls the plan and billing options.
Sharing Notes with Team Members
Events in OverOps are shareable, and you can add notes and share them with team members, or assign the event to team members. The added notes are attached to the specific event in the OverOps Dashboard.
To access the notes, make sure the column is visible in the grid (set/remove column to event list) as indicated with this  icon.
icon.
To add and share notes:
- From the Dashboard, open the event.
- From the upper left side, click Add a Note.
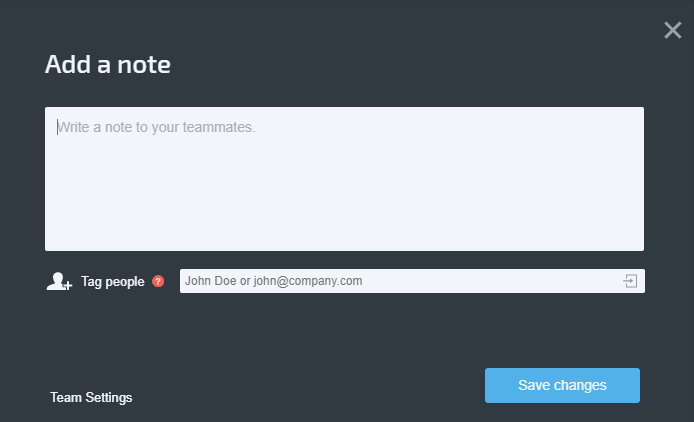
The Add a Note dialog box opens. - Enter/edit the note text and/or tag team members and click Save Changes.
Or
- From the Dashboard, click + to edit columns and check the Notes checkbox to add the Notes column.
- In the row of the event, click the icon to add or edit a note.
The Edit Note dialog box opens. - Enter/edit the note text and/or tag team members and click Save Changes.
The note will be attached to the specific error and will be visible to your team.

Add and share Notes.
Tagging Team Members
Notes are visible in the Dashboard to everyone in your team. Tagging specific team members sends them an email notification about the note. This tool helps you involve team members in the discourse on an event. All correspondence through notes is accompanied by email notifications (users with a "Viewer" role can also tag team members).
To tag team members:
- From the Add/Edit Note dialog box, enter the members names or their email addresses in the Tag people box and click Save Changes. (Note that the Settings Dashboard supports the use of very long email addresses).
New team members can also be invited to OverOps using this screen in order to view an error. When adding a non-registered user, OverOps offers to add them to your team. Click Yes, then Save.
Updating a Note
If a team member shares an error with you and you want to comment on it, you can edit the note. To do so, open the shared note from the dashboard and click the “edit” button on the top right side of the screen. Write your comment and save your changes, and the people tagged in the note will be notified of your comments. All team members tagged in a note (including its creator) will receive a notification when the note is updated.
Related Articles
Account Settings
Managing Event Visibility (Hiding Events)
Generate an Installation Key
Labels
Super Admin Role for On-Premises Deployments
Updated 9 months ago
