On-Premises Data Installation
Introduction
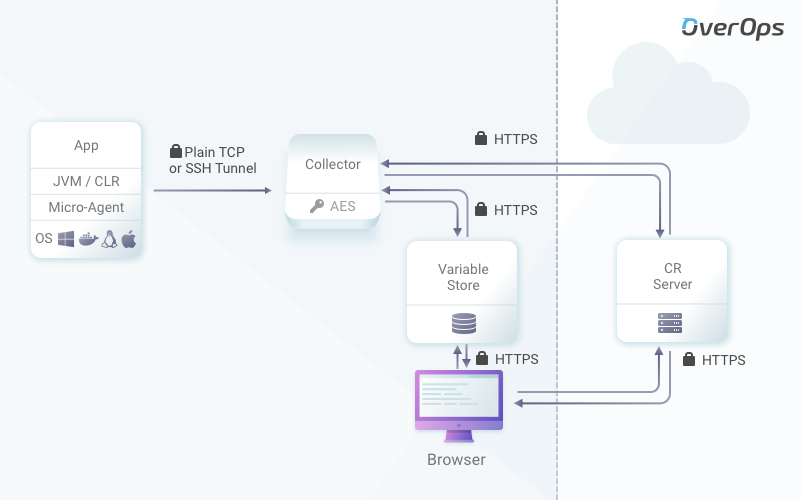
In an On-Premises Data Deployment there are three logical components to install and configure as shown in the schema below:
- Variable Store (aka Storage Server)
- Collector
- Micro-Agent

On-Premises Data Installation Procedure
The installation procedure includes the following steps:
- Install the Variable Store (aka Storage Server; see section below on preparing for an On-Premises Data installation on Linux).
- Install a Collector.
- Install a Micro-Agent.
- Attach the Micro-Agent and verify the connection.
Installing an EnvironmentThe installation procedure above assumes that you've already installed a working environment. If you haven't, refer to the article Add an Environment for an explanation on how to install one.
Variable Store OSThe Variable Store is only available for Linux, while the Collector(s) or Micro-Agent(s) can be installed on various operating systems.
- Optional (Advanced): Configure High-Availability and Load Balancing
Collector High Availability and Load BalancingOverOps supports multiple Collectors that can be configured for high-availability and/or for load balancing. For high-availability, traffic is routed as round-robin according to the master endpoint configuration.
For load balancing, routing depends on the load-balancer policy settings.
To configure Collector high availability and to build a Load Balancer using Nginx for multiple Collectors, follow the instructions for Configuring Collector Availability.
On-Premises Data Installation on Linux
When installing the On-Premises Data installation on a Linux machine, you'll need to install and set up the Variable Store to communicate over HTTP initially.
Note:The <STORAGE_IP> placeholder in this document stands for the IP address of the Variable Store.
Before installing the Variable Store, make sure you implement these steps:
- Create an OverOps account in https://app.overops.com.
- Generate a new installation key from the OverOps dashboard.
You can use an existing installation key only if no data has been loaded to it. This prevents
missed hits after the configuration is changed to On-Premises Data. - Verify that you have the relevant hardware and software requirements in place before beginning the installation.
Updated 9 months ago
