Install Analysis Server in Kubernetes with Helm
Introduction
In this section, we will install the Analysis Server using the OverOps Helm Chart which is preferred method of installing OverOps components on K8s.

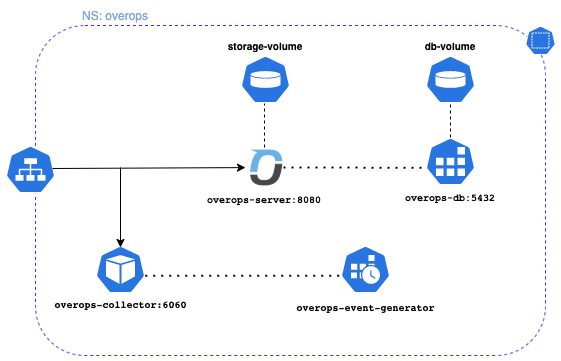
In the above k8s topology is a basic installation of the OverOps stack running in a namespace overops. This will cover an installation of the Analysis Server represented by the overops-server icon and its dependencies.
Note on SettingsIt's important to note that this procedure uses settings for demonstration purposes, it is recommended to work with OverOps support for a production installation on K8s.
Prerequisites
- This procedure assumes a K8s cluster is already available and you have kubectl and helm clients installed.
- The K8s cluster has access to the OverOps Docker hub repository.
- The K8s cluster can provision storage using a storage provider that can provision 20Gi volume
License KeyThe OverOps Analysis Server will deploy with a trial license, it is require to activate the OverOps Analysis Server for use.
Install the Analysis Server with the Helm Chart
Now with the helm repo added you are now ready to install the analysis server, by default the helm chart will install both the analysis server pod and a database pod (postgres.)
# Deploy the analysis server using helm
helm upgrade --install --wait --timeout 5m -n overops --set overops.defaultUserEnabled=false backend overops/overops-server
The above command will deploy and wait for pods to be ready. It also disables the default user as we will create the user on the server.
TIPKeep up to date on our OverOps Analysis Server Helm Chart and OverOps Server Docker.
Expose and access the OverOps Server
While there are many different ways to expose a service, in this example we can use port-forwarding to expose the OverOps server service which will allow you to access the OverOps site with a browser.
export POD_NAME=$(kubectl get pods --namespace overops -l "app.kubernetes.io/name=overops-server,app.kubernetes.io/instance=backend" -o jsonpath="{.items[0].metadata.name}")
export CONTAINER_PORT=$(kubectl get pod --namespace overops $POD_NAME -o jsonpath="{.spec.containers[0].ports[0].containerPort}")
echo "Visit http://overops.127.0.0.1.nip.io:8080/ to use your application"
kubectl --namespace overops port-forward $POD_NAME 8080:$CONTAINER_PORT
You can now access the OverOps site at http://overops.127.0.0.1.nip.io:8080/
WarningExposing the collector using port-forwarding is for demonstration purpose, work with your cluster admin to determine the best solution for exposing a OverOps analysis (backend) service.
Create a local user
In order to use the OverOps Analysis, you will want to create a user. This can be done by using the SIGN UP Button on the home page or by accessing the following link: http://overops.127.0.0.1.nip.io:8080/account.html
Enter basic account information and you are ready to use OverOps on Kubernetes!
NotePlease note running more than one instance of the OverOps Server in a ReplicaSet is not supported at this time.
Production Use of OverOps on K8sThese instructions install OverOps Analysis server for the purpose of demonstration, it is recommended to contact OverOps Support for production use.
Updated 9 months ago
